Cloudflare Access and Argo tunnel configuration
Cloudflare Access replaces corporate VPNs with Cloudflare’s network. Instead of placing internal tools on a private network, customers deploy them in any environment, including hybrid or multi-cloud models, and secure them consistently with Cloudflare’s network.
Cloudflare Access is one-half of the Cloudflare for Teams suite of products.
In this article, we will see how to implement Cloudflare access and argo tunnel with an IDP from Cloudflare and Terraform.
For the example we chosen Okta as Idp, Okta is one of leader on the IAM technology.
Argo Tunnel installation and configuration
In our case, we want to reach internal resources without a VPN. Argo tunnel will running directly from an internal server and will forward the traffic to the targeted resources.
Install cloudflared on the server who running the argo tunnel. The package installer is available directly from https://github.com/cloudflare/cloudflared/releases
Once installed run the following command to login your cloudflared instance to your cloudflared tenant :
cloudflared tunnel login

Once installed run the following command to login to your cloudflared instance to your cloudflared tenant. Once validated Cloudflare will return a cert.pem who’s allowing you to create, delete tunnels and manage DNS records directly with cloudflared.
Run your first argo tunnel with the command :
cloudflared tunnel create <NAME>
Once created you can list the argo tunnel created with the command :
cloudflared tunnel list
You should have a list like that :

Argo tunnel configuration
At this step you have created your argo tunnel but you have to configure it.
Cloudflared tunnel will call a YAML config file to run , the config file is generally specfied in ~/.cloudflared, /etc/cloudflared or /usr/local/etc/cloudflare
Config file should contain the tunnel id and the credential file generated with the command tunnel login.
Here an example of the config file :
tunnel: tunnel UUID
credentials-file: /root/.cloudflared/tunneUUID.json
logfile: /var/log/cloudflared.log
hello-world: true
loglevel: debug
autoupdate-freq: 2h

ingress:
  - hostname: ssh.gitlab.domain.com
    service: ssh://localhost:22
  - hostname: web.gitlab.domain.com
    service: https://localhost:443
    # This "catch-all" rule doesn't have a hostname/path, so it matches everything
  - service: http_status:404
With this file the tunnel allows us to join the target through ssh and HTTPS with two different hostnames.
Several flags are available for the config lets take a look to the present arguments :
- logfile → to log the tunnel ativities
- hello-world → test server for validating the argo tunnel setup
- loglevel → The verbosity levels of logs expected values trace, debug, info, warn, error, fatal, panic
- autoupdate-freq → the autoupdate freqency the default is 24h
Ingress rules allow you to route the traffic from multiple hostname to multiple services through cloudflared and the argo tunnel.
In the previous file, We will access my GitLab web interface through web.gitlab.domain.com and through ssh with ssh.gitlab.domain.com
A service for all rules is required at the last line, in this example, we use the http_status 404
Note that you can add the path to the hostname if you want.
The list of supported protocols is available here
You can validate your configuration and ingress rules with the command :
cloudflared tunnel ingress validate
This command will verify if the ingress rules specified in the file are valid.
cloudflared tunnel ingress rule https://web.gitlab.domain.com
This command will test the url and check if associated rules exist.
Route DNS traffic
As we saw previously we will reach our target from the hostname through cloudflared. That means we have to route the traffic from the cloudflare records to the argo tunnel instance.
We have two ways to do it lets take a look at these:
Cloudflared Dashboard
From the cloudflare dashboard select the DNS tab and add a new CNAME record. The record will point to the target tunelUUID.cfargotunnel.com, which is a domain available only through Cloudflare.

Click save to register.
CLI
As you saw previously we can manage our Cloudflare record once we have logged cloudflared with the certificate.
To add the record simply use the following command :
cloudflared tunnel route dns <UUID or NAME> web.gitlab.domain.com
Cloudflare Access configuration
Well at this step we have a working tunnel and DNS records to join internal applications. What we want to do is join the application through validation with our IDP and some policies like the below scheme.

Go to the >Cloudflare Teams dashboard and setup the IDP accordingly to this https://developers.cloudflare.com/cloudflare-one/identity/idp-integration
Note we will use Okta as IDP is in example.
Once the IDP added go to the Application Tab, click Add an application and select self-hosted

Enter an application name, the hostname created on the cloudflared config, and select the Identity Provider.

Click on next to continue on the policy rule
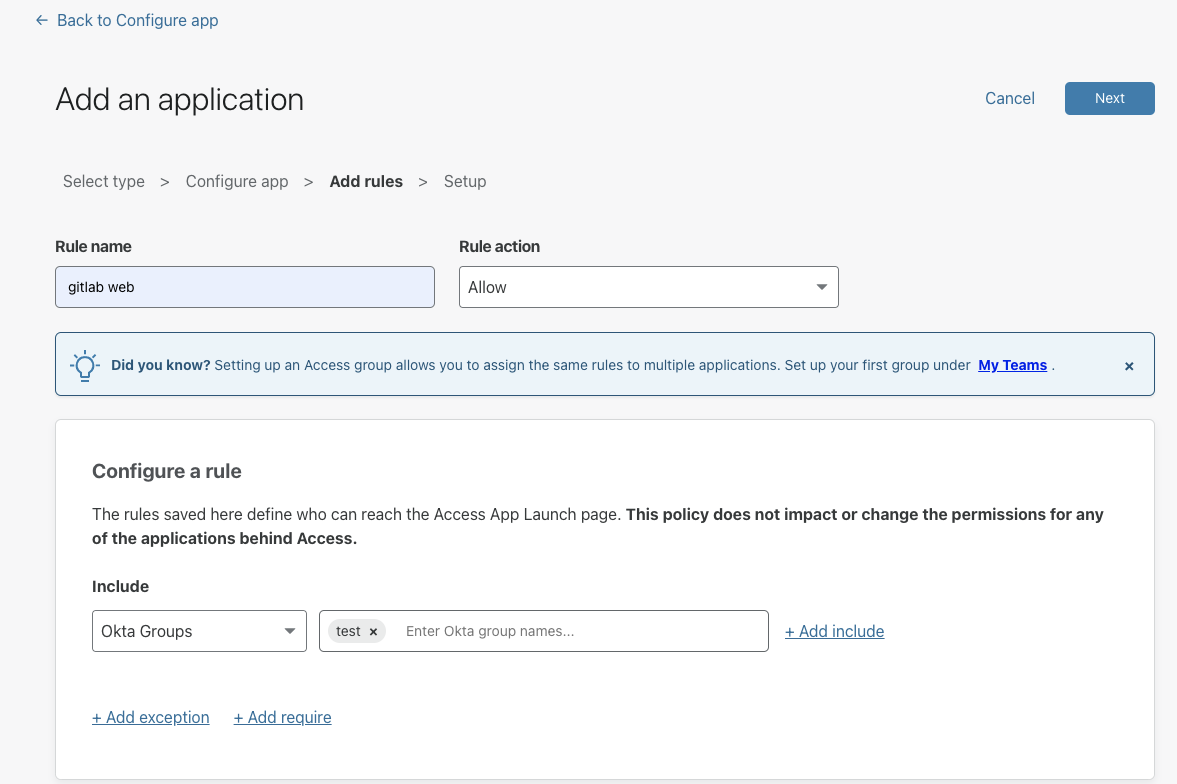
Select the Rule Action Allow and include the Okta Groups → test
This group is an existing group on our IDP.
Click next and Add application, you should have your created application like that :

Cloudflare app launcher
Now Let’s configure the App Launcher, this portal contains a dashboard with the available Cloudflare access app.
From Authentication select App Launcher and click Edit Access App Launcher.
Create a rule and add your IDP group :

You can rename your app launcher with the auth domain

Once configured connect on your app with the hostname you will be redirected to the app launcher.
Click on the IDP logo to sign in with.

Once logged from the IDP user will be redirected to the target.
To join the target through ssh user have to install cloudflared on his computer and configure a config file on his computer accordingly to this: https://developers.cloudflare.com/cloudflare-one/applications/non-HTTP/ssh/ssh-connections#1-update-your-ssh-configuration-settings
Once configured connect with classic ssh from the computer to the hostname will redirect the user to the the app launcher browser once the identity validated a token is returned to allow the connection through ssh.

Cloudflare Access configuration from Terraform
Is possible to configure your Cloudflare access configuration directly from Terraform instead of the dashboard.
You will find below an example for the configuration from Terraform :
terraform {
 required_providers {
   cloudflare = {
     source  = "cloudflare/cloudflare"
     version = "~> 2.0"
   }
# oauth Okta
resource "cloudflare_access_identity_provider" "okta_oauth" {
 account_id = "Cloudflare account id"
 name       = "Okta"
 type       = "okta"
 config {
   client_id     = "Client ID Okta app"
   client_secret = "secret Okta app"
   okta_account = "https://tenant.okta.com"
 }
}

resource "cloudflare_access_application" "gitlab_ssh" {
 zone_id                   = var.cloudflare_zone_id
 name                      = "Gitlab ssh"
 domain                    = "ssh.gitlab.domain.com"
 session_duration          = "24h"
 auto_redirect_to_identity = false
}

resource "cloudflare_access_application" "gitlab_web" {
 zone_id                   = var.cloudflare_zone_id
 name                      = "Gitlab web"
 domain                    = "web.gitlab.domain.com"
 session_duration          = "24h"
 auto_redirect_to_identity = false
}


resource "cloudflare_access_policy" "gitlab_ssh_policy" {
 application_id = cloudflare_access_application.gitlab_ssh.id
 zone_id        = "cloudflare zone id"
 name           = "gitlab ssh policy"
 precedence     = "1"
 decision       = "allow"

 include {
   okta {
     name                 = ["test"]
     identity_provider_id = cloudflare_access_identity_provider.okta_oauth.id
   }
 }
}

resource "cloudflare_access_policy" "gitlab_web_policy" {
 application_id = cloudflare_access_application.gitlab_web.id
 zone_id        = "cloudflare zone id"
 name           = "gitlab web policy"
 precedence     = "1"
 decision       = "allow"

 include {
   okta {
     name                 = ["test"]
     identity_provider_id = cloudflare_access_identity_provider.okta_oauth.id
   }
 }
}
In this previous example, the first block cloudflare_access_identity_provider allow the IDP configuration.
The blocks cloudflare_access_application define the application configuration, cloudflare_access_policy is for the policy configuration.
Is possible to export the three blocks information with returned variable.
Cloudflare terraform configuration guides are available from https://registry.terraform.io/providers/cloudflare/cloudflare/latest/docs.